Combining Sketches
This page is about combining multiple Arduino sketches into one
This page is about combining multiple Arduino sketches into one The next part of this guide describes these sections.
You can skip over this, then come back later and read it when your combined sketches don't work.
Sketch Sections
Arduino basic sketches have sections
- Block comments
- Single line comments
- Library Include Section
- Definition Section
- Global Variables
- Functions
- Setup
- Loop
Let's look at each of these sections in more detail.
Block comments
These can appear anywhere in the code. You will see them appear the most at the top with the author, description, etc.
Comments are ignored by the Arduino compiler. They are there to help you understand the code.
They can be used to temporarily disable code. This is useful when you are testing a section of code and you want to disable the rest of the code.
Example
cpp
/*
 * This is a block comment
 */
The block comments start with /* and end with */
Single line comments
A single line comment starts with // and ends at the end of the line.
Example
cpp
// This is a single line comment
When combining sketches, you can ignore the comment lines and comment blocks, if you want, as Arduino code ignores these.
Libraries Include Section
This section appears at the very top of the sketch.
Special Cases
There are some VERY special cases where a library may have a directive required before the library is loaded. This is very unusual but can happen. It will appear as a line of code that looks like this:
cpp
#define SOME_PIN 20
or
cpp
#define SOME_VALUE
before the include library statement
The library load/include command is in the form of:
cpp
#include <library file name>
This will load and include the library if it is in the standard library path. If you load a library using the library manager, then the library will be in the correct place to be loaded with this statement.
In some cases, the library file name may be in quotes, but this is a special case.
cpp
#include "library file name"
In the case the library file is not in the normal location, then if it is in the same directory as the sketch it will use the quote format.
Special Case
It may also have the full path to the file as well, but this is a special case.
Definition Section
Usually, a sketch will have constants here. These are variables that do not change.
Example
cpp
#define led_pin 13
#define num_leds 20
Pay Attention
There are no semi colons after a define.
Global Variables
A variable that is declared above the setup(), may or may not change value over time, and is used throughout the sketch - has a global scope. This means the variable can be accessed anywhere in the sketch.
Example
cpp
int led_counter = 10;     // this is a global variable
int led_counter;          // with no initial value
Servo myservo(servo_pin); // this is a global object
Functions
This is a section that may or may not be in the sketch. Usual coding practice is to have any functions that are used in the sketch located here.
These functions may be simple or complex.
Example
cpp
void blinkLED() {
    digitalWrite(led_pin, HIGH);
    delay(1000);
    digitalWrite(led_pin, LOW);
    delay(1000);
}
In the program, you would call this function with
cpp
blinkLED();
Setup
cpp
void setup() {
    Serial.begin(9600);
}
This is a special function that runs once when the Arduino starts.
Here, we place commands to start devices and/or libraries.
Set up serial ports, basically anything that needs to be done ONCE when the Arduino starts
Example
cpp
void setup() {
    Serial.begin(9600);       // start serial port
    pinMode(led_pin, OUTPUT); // set led pin to output
    pinMode(2, INPUT);        // set switch pin to input
    servo.attach(servo_pin);  // attach servo to servo pin
}
Loop
This is the section that runs all the time after setup.
Once setup has run, loop runs continuously. This is where your main code will be.
Example
cpp
void loop() {
    bool switchstate = digitalRead(2); // read switch state
    if (switchstate == HIGH) {
        digitalWrite(3, HIGH);         // turn on LED
        digitalWrite(4, LOW);          // turn off LED
        digitalWrite(5, LOW);          // turn off LED
    }
}
In this lesson on combining sketches, we will be using two sketches from the examples for two libraries.
One from LiquidCrystal Library

The other from Adafruit DHT Sensor Library

This is the first file DHT_Unified_Sensor

This is the second file Hello World

These files are accessible via the file, examples menu as shown – AFTER you load the libraries using the library manager
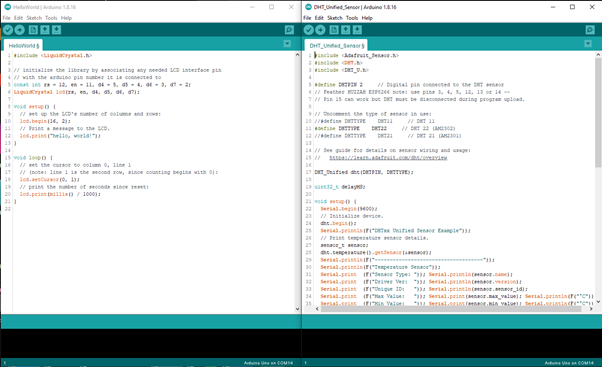
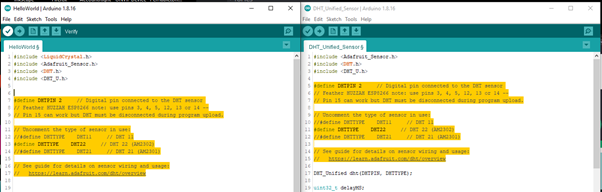
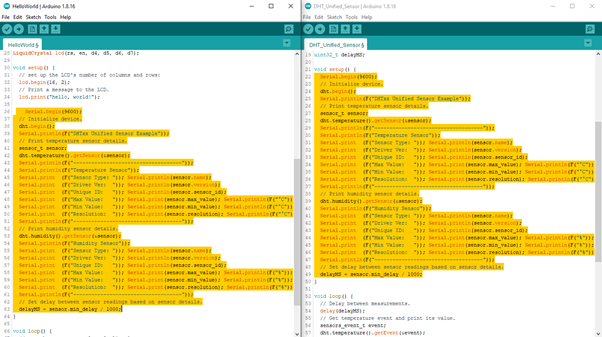
Here are the two files side by side. With the IDE you can open two files and set them up, side by side. Basically open the IDE twice.

in each file there is a large comments block. To tidy up, we will remove them. This is optional.
This gives us the two files – in a form that is a little easier to work on
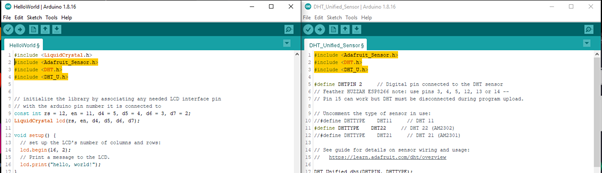
First up, we copy the library load section
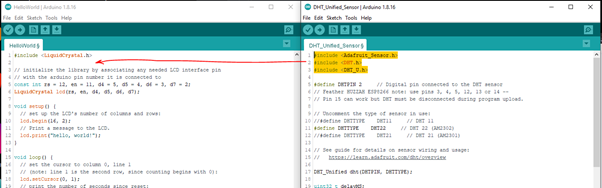
This is the section copied from right file to left file
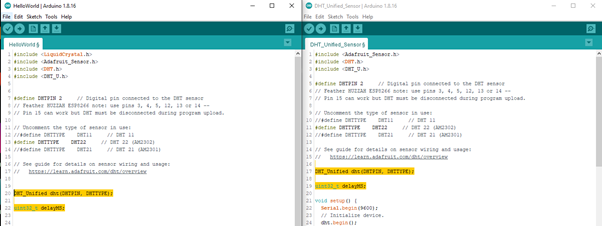
The next section is the Definition Section
In these particular files, there are definitions in one file. We copy from the right side to the left side sketch. Check that there are no definitions with the same names and/or different values.
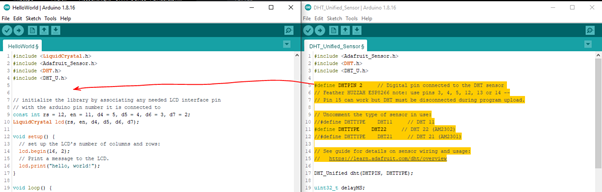
This is the section copied from right file to left file
Next is the Global Variables Section
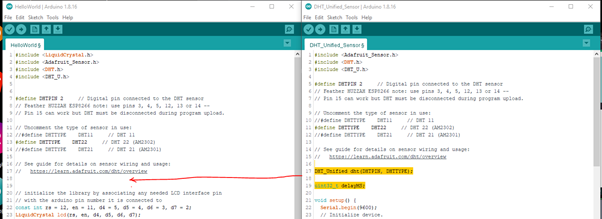
Copy the variables and library initializer values Again check that there are no variables with the same names and/or different values.
This is the section copied from right file to left file
Next section is the Setup
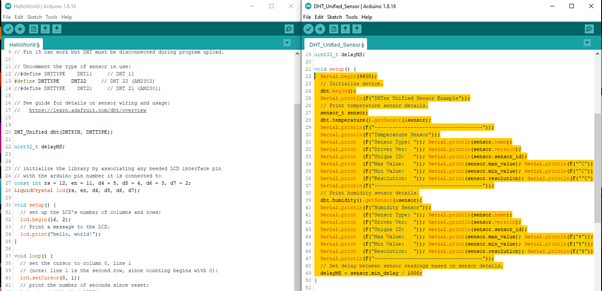
NOTE: The contents of the Setup as copied but NOT the

Or the

at the end.
This is the section copied from right file to left file
Next is the loop
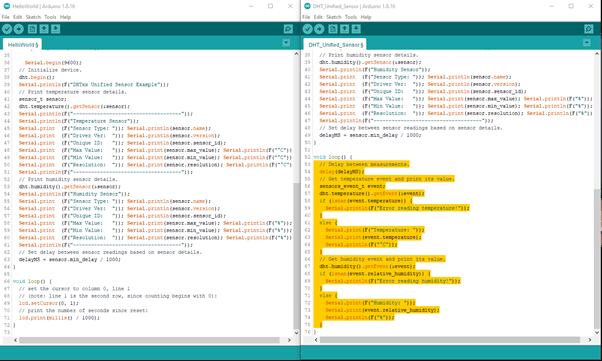
Pay Attention
The contents of the loop are copied but NOT the void loop()
cpp
void loop() {
Or the ending bracket
cpp
}
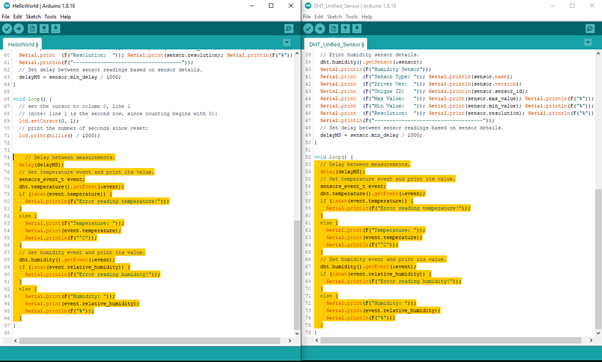
The two sketches are combined.
If you now run verify, the sketch on the left should be able to verify


This combined sketch is complete except for changing the code to use both sketches features

In this case, using the LCD to display the temperature and humidity readings